Wednesday, May 25, 2011

Week 4, Applique

They say you either love or hate Appliqué!
I happen to love it... There are many different techniques and it's a good idea to try them all until you find one that you do enjoy.

Appliqué refers to applying a piece of fabric on top of another. It is a necessary and handy technique to learn as a quilter. There are two kinds of appliqué: onlaid and inlaid.
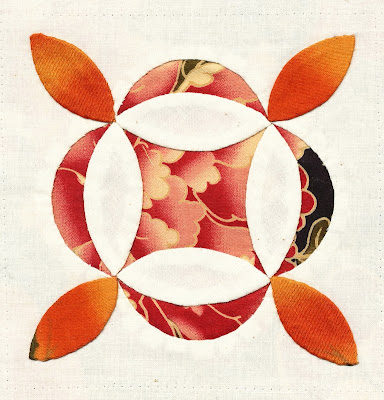

- this pattern is from the Jane Stickle quilt ( Junko's Flower Garden)

Inlaid appliqué is the cutting away of the top fabric and stitching it to reveal the design coming from the bottom fabric. In the above block the outer white fabric has been cut away to reveal the Japanese print below. (Then the eight oval shapes were appliqued on top, or onlaid!)
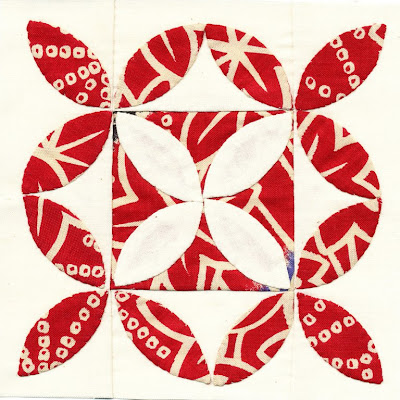

- Pattern is from the Jane Stickle quilt (Cheiko's Calla Lilly)

Onlaid appliqué is the process of placing a design on top of another fabric and stitching it down. In the above example sixteen oval shapes were appliqued on top of the base fabric.


Some prefer a fast and simple way to achieve onlaid appliqué using a fusible web (sold as Heat & Bond, Vliesofix etc). The web is ironed between the fabrics to create a permanent bond. The web can make the fabric stiff so avoid using this for larger pieces of appliqué. The fabric still needs to be finished around the edges to stop the edges fraying. You can either hand (difficult) or machine blanket stitch or apply “Fray Stop” glue to the edges before machine quilting. Here is a video that explains this method.

A more traditional technique is called Needle Turn Appliqué.

Here we will learn how to do this using freezer paper which gives you a sharp edge to turn under. The freezer paper is then removed when you’ve finished. The paper templates can be used over and over again. There are many videos on YouTube showing this technique, try this one and this one which uses the freezer paper under the appliqued shape.

You will need:

14” square of your background fabric
Pieces of fabric for your appliquéd design
100% sewing cotton to match your fabric
Needles: #11 sharps or a straw needle (milliner’s needle)
Fine, sharp straight pins
Pencil
Freezer Paper
Scissors for fabric/ scissors for paper
Iron

Instructions
1. Choose a pattern to appliqué
2. Trace the shapes onto the flat/ dull side of the freezer paper with pencil
3. Cut out the pattern
4. Iron it onto your fabric and cut around the edge leaving a ¼” seam
5. Using the original pattern as a guide, pin your appliqué piece to the background fabric, paper side on top! Mark any points or corners with a pencil or disappearing ink pen.
6. It’s best to start stitching on a straight side of the shape, towards a point.
7. If you are right handed sew towards your left (towards the heart), reverse this if you are left handed.
8. Tie a knot and bring your single thread up through both layers of fabric right on the edge of the paper.
9. Using your needle turn fabric under, take another stitch right next to it but onto the background fabric
10. From underneath bring your needle 3mm away and up, stitching through all layers on the edge of the paper
11. Continue stitching until the piece is sewn down.
12. Repeat with remaining shapes till your pattern is complete
Friday, May 20, 2011

Dresden Plate Circle


The middle of your Dresden Plate will have a hole that needs to be covered.
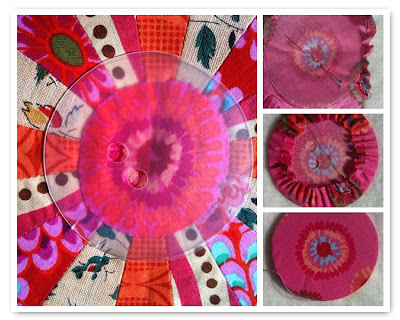
This is a nifty technique to make a tidy circle for this or any other block.

1. Draw a circle onto template plastic or cardboard that covers the whole by 1/2"
2. Using plastic allows you to fussy cut the fabric but you need to be careful ironing it
3. Sew a running stitch around the outside of the circle. I like to punch holes in my template so I can use a pin
4. Pull the thread to draw up the fabric around the template
5. Press the edges of the circle, careful not to touch the plastic with the iron
6. Flip out the template and press again with starch
7. Applique the circle on to the flower.

Hope that helps!

Tuesday, May 17, 2011

Week Three, Dresden Plate


Dresden Plate Template
This quilt block is a combination of patchwork and appliqué. It is a very striking block which is easy to make using this shortcut method.


You will need:

14” square of your background fabric
4.5"” x 10” strip of each of your other 4 fabrics for the petals
Sewing needle
Thread to combine with your fabrics
Pins
Pencil, manicure stick or knitting needle to poke out the point!

Using the template cut 4 tumbler shapes of each fabric. Trace template onto fabric and cut shapes out. You can flip the template along your piece of fabric to make the best use of it.

You can draw up your own template by drawing an angle of 22.5 degrees. Continue the lines up till you have a tall wedge. Cut the point off so that this bottom edge is around 1" wide. You want a template that's 4.5" tall through the centre of the template.

(Boring maths bit: a circle is 360 degrees so to get 16 petals we divided that by 16 = 22.5 degress. If you would like a 20 petal Dresden Plate you would divide 360 by 20 = 18 degrees)

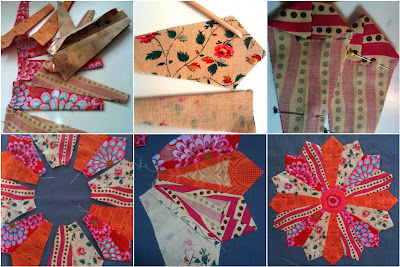
1. Lay out your petals in a pleasing arrangement
2. Fold petals in half, right sides together, lengthwise.
3. Stitch across the top, leaving a ¼” seam
4. Press the tip into a triangle and the seam flat
5. Turn the point so the seam is inside and it forms a neat triangle point, use a pencil or knitting needle
6. Lay the petals out again in order
7. Sew into pairs, pinning them together so they don't get muddled
8. Sew the pairs into fours and the fours into eights
9. Finally sew the two halves into a whole circle
10. Press well
11. Fold your 14” square into quarters and finger press the seams to mark the centre
12. Open up the background and lay the flower on top, turn it to find the best position but keep it centred
13. Pin into place
14. With combining thread, appliqué the petals onto the background fabric
15. Finally, create a cardboard or template plastic circle big enough to cover your opening by at least ½”
16. Cut a piece of fabric at least ½” bigger and tack around the outside, leave a thread tail
17. Pull the thread to draw up the circle neatly around the template
18. Starch and press, remove the circle template from the pressed fabric
19. Appliqué the circle onto your flower to cover the hole.
20. Admire your beautiful block and give yourself a pat on the back!

Tuesday, May 10, 2011

Week Two, Strip Piecing

This week we look at strip piecing, a technique which makes piecing blocks with many pieces of the same size very simple. Strip piecing can save you a lot of time at the cutting mat and sewing machine.

Rail Fence Cutting & Layout


Week One, Introduction

So much to take in on our first lesson!


It's important that we understand the language of patchwork and quilting and so we introduce the Anatomy of a Quilt. We talk about blocks, sashing, corner stones, binding and all the other elements that make up a quilt.
We also discuss colour and value and their important role in quilt design. Keeping your colour choices to the colours found in your preferred print fabric is an easy way for beginning quilters to select their palette. Have a good variety of fabrics, one or two stars and a supporting cast!


Different fabrics have different strengths within a patchwork design: plain fabrics, large and small scale prints, scattered patterns, stripes and florals. By moving around our cutting templates we can create a different effect within a quilt block, this is called "fussy cutting". Remember to cut fabrics "on the grain" as much as possible, place straight edges of any square shapes along the length of fabric threads. Diagonal edges should be cut on the bias. Following this simple rule allows your blocks to lie flat and ultimately your quilt also be straight.

A quick introduction to the common tools that quilter's use: needles, fine glass head pins, 100% cotton fabrics and cotton thread. Cutting patchwork pieces with scissors is very time consuming, a rotary cutting system can really speed things up. You will need a rotary cutter, a self healing cutting mat and a thick acrylic ruler. Be careful with the rotary cutter, keep it out of reach of children and always engage the safety latch.


Finally, we get to cut and stitch together our first block. We are working on 12" blocks for this sampler quilt. The larger size allows us to complete enough blocks in 8 weeks to make a small quilt. Individual blocks can also be used to make cushions, mug rugs, pot holders and little wall hangings. When stitching together our blocks we use a scant 1/4" seam. All pattern pieces are cut with the seam allowance included.


This week we focus on "nine patch" construction, a simple 3 x 3 grid. Chose from a simple Nine Patch, or the more complex Shoo Fly, Card Trick and Ohio Star. The last three incorporate triangles.