Saturday, November 26, 2011

Sewing with templates

LA 20 blocks mosaic

This post has been a long time coming. How to break down and describe the process of designing, fussy cutting and sewing a block using Marti Michelle’s Set H.

I first purchased a set of these in a quilt shop but felt too intimidated to use them. Then I bought the accompanying book but it still wasn't making much sense. It wasn’t till I attended a class with Catherine Butterworth that it all gelled and made sense, she’s a wonderful teacher.  Now I’m enjoying arranging the shapes with different prints and colours to create unique blocks and looking forward to creating more quilts using some of the other template sets.

Prior to this the only way I’ve tackled hexagons and inset seams was using English Paper Piecing. Now that I’ve used the Perfect Patchwork templates it’ll be pretty hard to go back to that method for a large quilt. Sewing hexagons and inset “y seams” with your sewing machine is much faster and almost fool proof. The template set comes with 3 acrylic templates to create 11 shapes.

image

By taking the focus away from the construction I’ve found I am playing more with the designs and having lots of fun with all the different tessellations that fit inside the finished 6” sided hexagon. (Marti Michelle templates are measured by the length of a hexagon’s side)

So how do you start?

Firstly, pick some fabric you can play with. There are lots of wonderful prints that start to take on a life of their own once you’re armed with a tessellating shape and Marti Michelle’s Magic Mirrors.

Make a cardboard window of the finished size of your diamond by using the markings on the acrylic template. Move the window over your fabric and use the “magic mirrors” to help you find a placement that works.

Once you’ve selected the area you want to use, mark the corners so you can align the acrylic template and cut the precise shape. Cut using a small or medium rotary cutter, make sure you clip the engineered corners off. They really make a difference when you are sewing the seams together!

Use this shape to help you with placing the other 5 diamonds.

A warning: make sure you’ve got enough of the fabric to yield 6 repeats, I’ve been caught out more than once! Generally speaking fabric repeats every 24” so you will need 1.5 yards of fabric to get 6 exact large diamond pieces across the length of the fabric. Be aware that you will need a lot more fabric than if you are cutting shapes from a strip.

IMG_3214


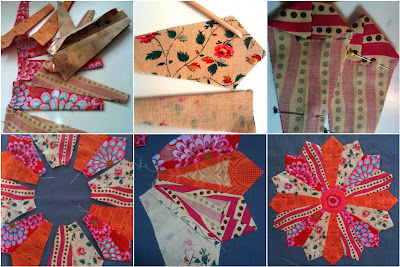
To piece the diamonds into the star shape you will need to mark the starting and stopping points of the seams on your diamond shapes. Mark them on the back of your diamonds with a pencil. I’ve found chalk rubs off and makes piecing the blocks together difficult.

Align two diamond shapes together, face to face.

Starting at the first dot, tie a knot (or make a couple of “zero stitches”) and stitch along the 1/4” seam till you approach the end dot. Tie off and cut the thread. Repeat with the other diamonds. Join the first and the last diamonds together in exactly the same way. Make sure you keep the seam allowances out of the way.

IMG_3107IMG_3110

Start with simple diamond shapes till you’ve mastered the cutting and piecing techniques. Press the seams to face one way and “swirl” the centre seam to reduce the bulk at the middle.

By using 6 more diamonds, we can fill in the spaces between out star “arms” to make a hexagon.

IMG_3162

That’s all for today, will put some more information together to post here soon… Please let me know if you have any questions.

have fun xx

Tuesday, October 4, 2011

Progress: Little Apples

Well imagine my surprise when Aneela Hooey herself mentioned my first Little Apples hexagon block on her blog! I mean, could there be any greater honour than the fabric designer herself liking what you’ve made with her creation?

I’m quite taken by the Little Apples fabric range. The more I cut into it, the more possibilities I see in fussy cutting and complementing it with other fabrics in my stash.

Like the vintage Kaffe Fassett in the centre of block #10. I think it looks like disco balls with hedgehogs dancing around.

LA # 10

And whilst this quilt began as a way to learn a new technique I am determined to complete a full size quilt now, just so I can play with these cool shapes and create kaleidoscope like blocks. I wake up with new ideas of how to transform a lone little turtle into a sophisticated patchwork block.

LA turtles

Or form new shapes from barely recognisable items of clothing…

LA Book & scarf block

I think my favourite so far is the Super Reading Girl block. She is so cool with her book in hand and the mustard text swirling around.

LA #9

I’ve been taking some photos and putting together a little tutorial on how I’ve been constructing these block. I feel so liberated sewing these by machine. No papers to tack, no slow whipstitching and the backs are just as pretty as the fronts with all their swirled seams.

swirled seams

I’m thinking that the Marti Michelle templates are better than any cutting system as you can align them directly over the fabric for fussy cutting.

Now excuse me as I get back to playing with my fabric… x Lorena

Sunday, September 11, 2011

Fine fabric, friends and food = FUN!

This weekend I attended the Quilters Gathering at Ulladulla. I first went to one a few years ago and had such a wonderful time I was keen to go again. Life often gets in the way of doing what we really want to do and then there’s the guilt of starting yet another patchwork project.

But an important lesson I took way from this weekend (apart from all the fabulous construction techniques) was that I enjoy focusing on the journey not the destination! I love learning new ways of doing things, playing with new fabric and making new friends. If I have a finished quilt at the end it’s a bonus that my family appreciates.

My workshop was the Hexagon Stars with Catherine Butterworth, a Marti Michelle educator. Catherine is a great teacher and lots of fun. Her instructions are clear and she’s so generous with all her tips and hints. I feel that after 2 days I have all the knowledge necessary to explore and construct my own beautiful blocks using the template set. As an aside I had purchased the book (Six is for Hexagons by Marti Michelle) and templates last summer but was a little overwhelmed to try it, the workshop definitely helped but I’m sure you could work it out if you can read the instructions from cover to cover. That’s all I needed to do - RTFM!

Ulladulla Stars & Hexagons

Her teaching quilt was gorgeous, full of fussy cut treasures, interlocked and leading the eye over the quilt surface, like a tapestry.

This is just a quick snapshot I took showing the different fabrics she chose to fussy cut.

Whilst the heavy dark tones didn’t really do it for me I could see that this technique leads to wonderful results. And it’s all machine pieced!! No piecing over papers, stitches all neatly tucked away. It’s pretty cool.


Here are my blocks:

LA # 1

I kept my first block simple, a big hexagon and radiating triangles set in with diamonds.

I used the Little Apples Layer Cake by Moda. I picked it up because it was such a bargain but had no idea what to do with it… the fabrics are so stinking CUTE!

I followed instructions and the whole block came together beautifully.


LA #2

This is the second one I did using the more complex construction technique of “inset Y seams”. Usually these would send chills down my spine and I’d revert to hand sewing but with accurate pieces and “engineered corners” it also went together beautifully.

Except for my picking up one Hula Hoop girl and stitching her in upside down, OOPS!


LA #3

I was getting pretty confident by block number 3.

I played around with different points on the radiating triangles.

Loving the Little Apples fabric by now… not loving the fabric stash I picked to coordinate.

Did I mention there’s a quilt shop down the road? 30% discount for attendants? Handy!


LA #4

Ok, this one was a bit of a stretch. Diamonds made from 4 pieces of fabric means I had to really look at the grain lines carefully. Lots of cutting, simple edge to edge sewing and carefully pressing.

I don’t want this quilt to be too cute so just used the Dotted Lines from the Little Apples fabric. I think it looks like stitching…


LA first blocks


This isn’t saying table runner or wall quilt to me… I think it’s gotta be another bed quilt.

Looking forward to receiving a little bit of yardage to play some more.


Other workshops were being taught by Beth and Trevor Reid, Lessa Siegele, Jane MacDonald, Michele Hill, Jenny Bowker, Gail Simpson and Bernie Varkevisser. At show and tell after dinner on Friday we saw all the stunning teaching quilts and last year’s finished projects. Very inspiring.

If you’d like to go to the Gathering next year, put it in your diary for August 17/ 18! If you love patchwork and quilting you wont regret it. The venue was outstanding, they kept us well fed and watered. The company was entertaining and the workshops all looked amazing. Can’t wait to go back!

Wednesday, July 20, 2011

The upside to Winter...

It's the perfect time of the year to stay indoors and make a quilt! Brr... it's cold and wet out there.

Before I begin a quilt project I like to look at colour combinations and envisage the end result. If you have quilting software this is pretty easy but you can do it with MSWord too. Have a look at Amy's great blog post Visualizing Quilts using Word. However, sometimes I just want some good old fashioned colouring paper with a graph, hexagons or diamonds to work out how a pattern is developing.

You can generate and print out your own here to your specifications. Free. Pretty cool huh?


Someone also asked how I made the little name labels that I sew onto my creations. I thought about ordering custom made labels from Etsy but I didn't like the idea that I'd be stuck with it if I wasn't in love with them. Plus they're not that cheap... and I don't need that many!

Here's the way I did it...

1. Muck around in MSWord or your prefered publishing software and come up with a design (frankly, this is often the hardest part!)

2. Arrange the design on an A4 sheet leaving at least 2" between each design. Keep them in rows as that will make it easier when it comes to cutting them out.

3. Once you are happy with the arrangement go ahead and print it out on paper, cut it up and play with the label size, fold it and pretend you're sewing it onto your clothing, your pencil case your bag etc... Before you print mark an x on the bottom right hand corner of the paper sheet as it sits in the tray. You may be glad you did this later!

4. Once you're convinced that the design and label size works, take a piece of freezer paper cut to A4 size and a piece of fabric cut to A4 size. I use Ecology cloth (a fine quilter's muslim) because it is nice and stiff and doesn't shift in my bubble jet printer. I've also used Kona cotton and other fabrics without problems.

5. Place the fabric piece (right side up) over the shiny side of the freezer paper and press it along the top edge so that it sticks.

6. Put your fabric/ freezer paper combo into the printer paper tray facing so that the print will be on the fabric and the ironed edge is taken up by the print roller first. On my Pixma that means the freezer paper side on top and the ironed edge first. Yours may be different, if you like me have trouble visualizing this step that's where the little x mark you made earlier comes in handy. If the x is on the printed side you will need to place your fabric side UP!

7. Print out our design and then use a hot iron to set the ink.


8. That's it! You have designed and produced your own in house labels. Not much to it really... You can use the same technique to make labels for your quilts!


Thursday, June 23, 2011

Binding your quilt


Different prints can add visual interest to a quilt edge. Look for evenly spaced dots, small scale prints, horizontal or diagonal stripes. Audition 1/2' strips across the width of the fabric along your finished quilt top so you know what it will look like before you cut into it!
There's nothing like the feeling of finally finishing your quilt with a good binding! It feels lovely and completes your quilt.

A binding can add visual interest to a quilt, it can also help frame your quilt top. Experiment with using fabric scraps from your quilt, stripes and spots also look great. Sometimes a solid colour binding can hold a busy design together.

I like to use a double binding cut across the width of the fabric as it lasts longer, quilt edges can get a lot of wear and tear if used daily. Bias binding is more often used for scalloped or pointy edges as they are thinner and follow curves more readily.

I also like my bindings to be narrow and plump so I cut them 2.5" wide. That gives me enough to include the 1/2" edge and wadding snuggly. You may prefer a flatter, wider binding, you'll need to experiment to work out your preferences.

Remember to join strips on the diagonal so the seams aren't too bulky!

To work out how much binding you need measure around the outside of your quilt. You will need an extra 10" or so to be on the safe side. There are so many excellent tutorials available showing you how to bind your finished quilt!

This one shows you how to attach the binding by machine and then hand stitch to finish. This is my preference as your stitches will not show through to the quilt front.
If you really can't face 4 metres of hand stitching you will need to practice this machine stitching technique before you attempt it on your quilt. Make sure your top thread matches the binding and your bottom thread matches your quilt backing fabric if you are machine stitching. This technique would only suit bindings made from a continuous colour or you would have to change the top thread often.

Once your binding is finished many quilters like to label their quilts. More about that next time!

Tuesday, June 21, 2011

On Point Layout, 9 pieced blocks

And finally... here are the cutting and layout instructions for a lap quilt using 9 pieced blocks and 4 plain blocks. This quilt is set on point which makes for slightly trickier cutting and construction techniques...

Square Lap Quilt on POINT

Thursday, June 16, 2011

Fabric & Cutting Requirements for your SQUARE LAP QUILT

Print out the fabric and cutting requirements to finish a quilt using 16 x 12" blocks here:

Square Quilt Fabric and Cutting

Fabric and Cutting Requirements for your BABY QUILT

Print out the fabric and cutting requirements for your Baby Quilt here:

Baby Quilt Fabric and Cutting

Week 7, Scrap Busting Blocks

Well, this week we were going to attempt some blocks to use up scraps from this quilt but -we got sidetracked looking at our final quilt construction, quilting techniques and finishing. That's all good but you're probably still wondering what you're going to do with your scraps!

So here are some ideas for blocks that use strips, triangles and other fabric scraps. There has been a trend over the past few years towards improvised blocks .

I bet you'd never thought you'd be looking at quilting trends when you signed up did you?


This image of 2006 Gees Bend Commemorative Stamps from is taken from this website.

A great example of the improvised block style are the Gees Bend Quilts and this modern look has been taken up by many quilters and designers like Denyse Schmidt. In fact, you can attend day long workshops with Denyse to learn how to make your quilt blocks look random and unstructured!

Many quilters aim to use up all our scraps, sometimes it's the only time we practice frugality. And whilst we may think that fabric is a pricey luxury today, historically it was a precious commodity and nothing was wasted. Clothing was recycled into bedding, ribbons pieced together to make tablecloths and bedcovers, old blankets cut up, pieced together and embellished into a new blanket or drapes.

Here are some of my favourite scrappy blocks:


1. The log cabin block, perfect when you have many left over strips. They don't need to be the same width and colour. A wonderful effect can be achieved by mixing colours, tonal value and size. If you have lots of strips you may also want to try a Stacked Block.

2. Spider web block. The neat thing about this block is that you sew the scraps onto a foundation so you can use up even your tiniest scrap, this is called string piecing. Here's a great tutorial on this technique at Sew, Mama, Sew!


3. Improv block. A real beauty, anything goes! Work with a solid or neutral fabric as a base and piece scraps randomly till they are pleasing and the correct size. The Sometimes Crafter has a great post about piecing these blocks.


4. Blocks using tiny squares eg the Postage Stamp block, Sashed 9 Patch and C12 Family Reunion from the Dear Jane quilt.

There is a whole section of the quilting world dedicated to scrap quilting, I can't wait to get my copy of Scrap Republic by Emily Cier later this year. Try Amy at Badskirt and Mari at The Quilting Edge for some inspirational photos.

PS

Don't worry, I haven't forgotten about the quilt layout dimensions you asked for. I'll have to upload those tomorrow! Lorena x

Thursday, June 9, 2011

Week 6, Foundation Paper Piecing


Click on the image to enlarge. More details available on my flickr page


Get ready to stretch your mind!

Foundation paper piecing is not an easy concept to grasp for the first time. In fact it can be downright frustrating as many of you experienced on Wednesday night! The fact is that you can get by as a quilter without ever learning this technique but it sure makes easy work of blocks with many angled seams, miniature pieces and precision points.


Once you learn this technique it's just another tool to tackle a complex block. Like most things, you get better with practice and making multiples is much easier than making just one.


Piecing over a foundation of paper or stabiliser fabric lets beginners achieve a difficult look without struggling with seam allowances and questions over which direction to press them.


You will need a few tools by your side when you start: a cutting matt, a rotary cutter, a ruler, some pins and an iron. Don't ever use steam when you press paper pieced block as the ink can ruin your fabrics.


Next you will need to select a pattern and either draft it onto graph paper using a pencil or use quilting software (I use Electric Quilt) to design and print out your foundation pattern.


By breaking down a block into rectangular units and then joining these units together you can make up some wonderful shapes. For example the alphabet, animals and many traditional pieced blocks.

Wednesday, June 1, 2011

Week 5, English Paper Piecing


This image of an antique quilt is from www.snippetsnscraps.blogspot.com/2010/07/peeling-back-layers-2.html
English Paper Piecing is a patchwork technique steeped in history and is still used extensively by modern quilters. It's a particularly useful technique for creating one patch quilts (quilt tops made from one tessellating shape) and blocks with many inset or “y” seams.


This is part of a corner block from the Jane Stickle quilt.


Many quilters like sewing over paper or cardboard templates as the project can be carried along and sewn by hand. Piecing a complex shape with straight sides using the English Paper Piecing method is pretty easy and as long as your templates are cut to the right size, the pieces will always fit together. You don’t really need to worry about accurate ¼ “ seams either.


This block was made using The Sometimes Crafter excellent Tutorial, you can download templates there too.
Rather than reinvent the wheel and try to put everything in my own words I recommend you head over to www.lizardofoz.com.au/Free_Stuff/Pdfs/English_piecing.pdf for a definitive guide on English Paper Piecing. They sell pre made templates from lightweight card. These templates are also available from your local quilt store and online.


You can also print out your own templates by using websites such as http://incompetech.com/graphpaper/trianglehex.html Alternatively you can draft templates using graph paper and trace the shapes onto card. I've uploaded a couple of graph papers here to get you started:


By fussy cutting the fabric for each shape you can create secondary patterns with just one piece of fabric. Be warned... This can be a lot of fun and very addictive!


The cardboard templates can be reused many times so don’t throw them away. Be sure to sort all your different sizes and label them as a slight change in length of a side means your shape will not tessellate properly. Take care when cutting out your templates too, try and cut in the middle of a printed line and allow for the extra bulk when you are tracing templates.


Once you've made your shape you can either applique it onto a square of your background material or keep adding hexagons, diamonds etc till you have enough to cover the area of your block. It is possible to create a square edge by trimming shapes around the edges, make sure you remember to leave a seam allowance!

Wednesday, May 25, 2011

Week 4, Applique

They say you either love or hate Appliqué!
I happen to love it... There are many different techniques and it's a good idea to try them all until you find one that you do enjoy.

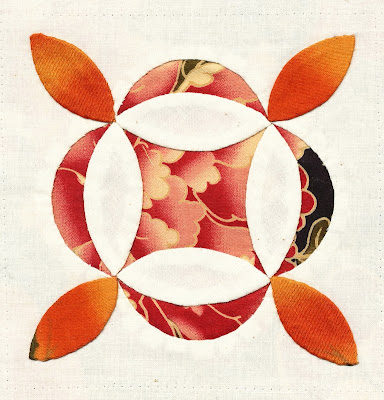
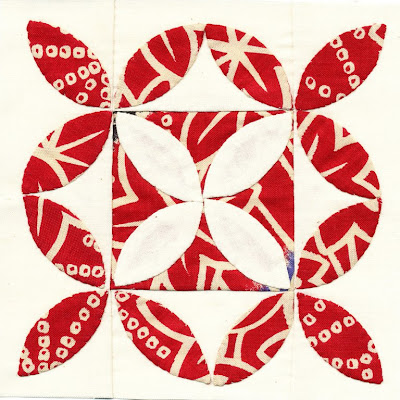
Appliqué refers to applying a piece of fabric on top of another. It is a necessary and handy technique to learn as a quilter. There are two kinds of appliqué: onlaid and inlaid.


- this pattern is from the Jane Stickle quilt ( Junko's Flower Garden)

Inlaid appliqué is the cutting away of the top fabric and stitching it to reveal the design coming from the bottom fabric. In the above block the outer white fabric has been cut away to reveal the Japanese print below. (Then the eight oval shapes were appliqued on top, or onlaid!)


- Pattern is from the Jane Stickle quilt (Cheiko's Calla Lilly)

Onlaid appliqué is the process of placing a design on top of another fabric and stitching it down. In the above example sixteen oval shapes were appliqued on top of the base fabric.


Some prefer a fast and simple way to achieve onlaid appliqué using a fusible web (sold as Heat & Bond, Vliesofix etc). The web is ironed between the fabrics to create a permanent bond. The web can make the fabric stiff so avoid using this for larger pieces of appliqué. The fabric still needs to be finished around the edges to stop the edges fraying. You can either hand (difficult) or machine blanket stitch or apply “Fray Stop” glue to the edges before machine quilting. Here is a video that explains this method.

A more traditional technique is called Needle Turn Appliqué.

Here we will learn how to do this using freezer paper which gives you a sharp edge to turn under. The freezer paper is then removed when you’ve finished. The paper templates can be used over and over again. There are many videos on YouTube showing this technique, try this one and this one which uses the freezer paper under the appliqued shape.

You will need:

14” square of your background fabric
Pieces of fabric for your appliquéd design
100% sewing cotton to match your fabric
Needles: #11 sharps or a straw needle (milliner’s needle)
Fine, sharp straight pins
Pencil
Freezer Paper
Scissors for fabric/ scissors for paper
Iron

Instructions
1. Choose a pattern to appliqué
2. Trace the shapes onto the flat/ dull side of the freezer paper with pencil
3. Cut out the pattern
4. Iron it onto your fabric and cut around the edge leaving a ¼” seam
5. Using the original pattern as a guide, pin your appliqué piece to the background fabric, paper side on top! Mark any points or corners with a pencil or disappearing ink pen.
6. It’s best to start stitching on a straight side of the shape, towards a point.
7. If you are right handed sew towards your left (towards the heart), reverse this if you are left handed.
8. Tie a knot and bring your single thread up through both layers of fabric right on the edge of the paper.
9. Using your needle turn fabric under, take another stitch right next to it but onto the background fabric
10. From underneath bring your needle 3mm away and up, stitching through all layers on the edge of the paper
11. Continue stitching until the piece is sewn down.
12. Repeat with remaining shapes till your pattern is complete

Friday, May 20, 2011

Dresden Plate Circle


The middle of your Dresden Plate will have a hole that needs to be covered.
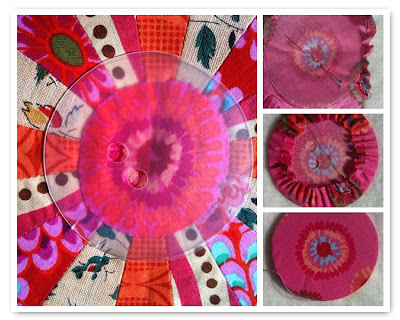
This is a nifty technique to make a tidy circle for this or any other block.

1. Draw a circle onto template plastic or cardboard that covers the whole by 1/2"
2. Using plastic allows you to fussy cut the fabric but you need to be careful ironing it
3. Sew a running stitch around the outside of the circle. I like to punch holes in my template so I can use a pin
4. Pull the thread to draw up the fabric around the template
5. Press the edges of the circle, careful not to touch the plastic with the iron
6. Flip out the template and press again with starch
7. Applique the circle on to the flower.

Hope that helps!

Tuesday, May 17, 2011

Week Three, Dresden Plate


Dresden Plate Template
This quilt block is a combination of patchwork and appliqué. It is a very striking block which is easy to make using this shortcut method.


You will need:

14” square of your background fabric
4.5"” x 10” strip of each of your other 4 fabrics for the petals
Sewing needle
Thread to combine with your fabrics
Pins
Pencil, manicure stick or knitting needle to poke out the point!

Using the template cut 4 tumbler shapes of each fabric. Trace template onto fabric and cut shapes out. You can flip the template along your piece of fabric to make the best use of it.

You can draw up your own template by drawing an angle of 22.5 degrees. Continue the lines up till you have a tall wedge. Cut the point off so that this bottom edge is around 1" wide. You want a template that's 4.5" tall through the centre of the template.

(Boring maths bit: a circle is 360 degrees so to get 16 petals we divided that by 16 = 22.5 degress. If you would like a 20 petal Dresden Plate you would divide 360 by 20 = 18 degrees)

1. Lay out your petals in a pleasing arrangement
2. Fold petals in half, right sides together, lengthwise.
3. Stitch across the top, leaving a ¼” seam
4. Press the tip into a triangle and the seam flat
5. Turn the point so the seam is inside and it forms a neat triangle point, use a pencil or knitting needle
6. Lay the petals out again in order
7. Sew into pairs, pinning them together so they don't get muddled
8. Sew the pairs into fours and the fours into eights
9. Finally sew the two halves into a whole circle
10. Press well
11. Fold your 14” square into quarters and finger press the seams to mark the centre
12. Open up the background and lay the flower on top, turn it to find the best position but keep it centred
13. Pin into place
14. With combining thread, appliqué the petals onto the background fabric
15. Finally, create a cardboard or template plastic circle big enough to cover your opening by at least ½”
16. Cut a piece of fabric at least ½” bigger and tack around the outside, leave a thread tail
17. Pull the thread to draw up the circle neatly around the template
18. Starch and press, remove the circle template from the pressed fabric
19. Appliqué the circle onto your flower to cover the hole.
20. Admire your beautiful block and give yourself a pat on the back!

Tuesday, May 10, 2011

Week Two, Strip Piecing

This week we look at strip piecing, a technique which makes piecing blocks with many pieces of the same size very simple. Strip piecing can save you a lot of time at the cutting mat and sewing machine.

Rail Fence Cutting & Layout


Week One, Introduction

So much to take in on our first lesson!


It's important that we understand the language of patchwork and quilting and so we introduce the Anatomy of a Quilt. We talk about blocks, sashing, corner stones, binding and all the other elements that make up a quilt.
We also discuss colour and value and their important role in quilt design. Keeping your colour choices to the colours found in your preferred print fabric is an easy way for beginning quilters to select their palette. Have a good variety of fabrics, one or two stars and a supporting cast!


Different fabrics have different strengths within a patchwork design: plain fabrics, large and small scale prints, scattered patterns, stripes and florals. By moving around our cutting templates we can create a different effect within a quilt block, this is called "fussy cutting". Remember to cut fabrics "on the grain" as much as possible, place straight edges of any square shapes along the length of fabric threads. Diagonal edges should be cut on the bias. Following this simple rule allows your blocks to lie flat and ultimately your quilt also be straight.

A quick introduction to the common tools that quilter's use: needles, fine glass head pins, 100% cotton fabrics and cotton thread. Cutting patchwork pieces with scissors is very time consuming, a rotary cutting system can really speed things up. You will need a rotary cutter, a self healing cutting mat and a thick acrylic ruler. Be careful with the rotary cutter, keep it out of reach of children and always engage the safety latch.


Finally, we get to cut and stitch together our first block. We are working on 12" blocks for this sampler quilt. The larger size allows us to complete enough blocks in 8 weeks to make a small quilt. Individual blocks can also be used to make cushions, mug rugs, pot holders and little wall hangings. When stitching together our blocks we use a scant 1/4" seam. All pattern pieces are cut with the seam allowance included.


This week we focus on "nine patch" construction, a simple 3 x 3 grid. Chose from a simple Nine Patch, or the more complex Shoo Fly, Card Trick and Ohio Star. The last three incorporate triangles.